模型部署

部署

在软件开发过程中,当你写好了软件,要放置在实际运行环境中,这个过程就是部署

软件是怎么部署的呢?一般来说,我们可以通过安装软件需要的环境和依赖,使得软件能够部署到实际应用环境中

模型部署

模型部署和软件部署的区别是:因为框架太大太繁重,很难单纯靠着配环境的方式进行模型的部署

比如模型是pytorch写的,最终要在手机应用上运行,尽管模型的代码文件本身不大,但是pytorch这个框架就很难安装到一个小小的手机上

再加上很多模型对于运行速度有要求,在训练时,可能会用到一些额外的操作和记录,比如记录梯度等,而在实际推理的过程中,参数和模型的结构都是固定下来的,所以完全可以根据训练好的模型的特定结构对模型进行简化

目前模型部署的流程是:

由深度学习框架编写并训练好的模型 -> 中间表示 -> 推理引擎

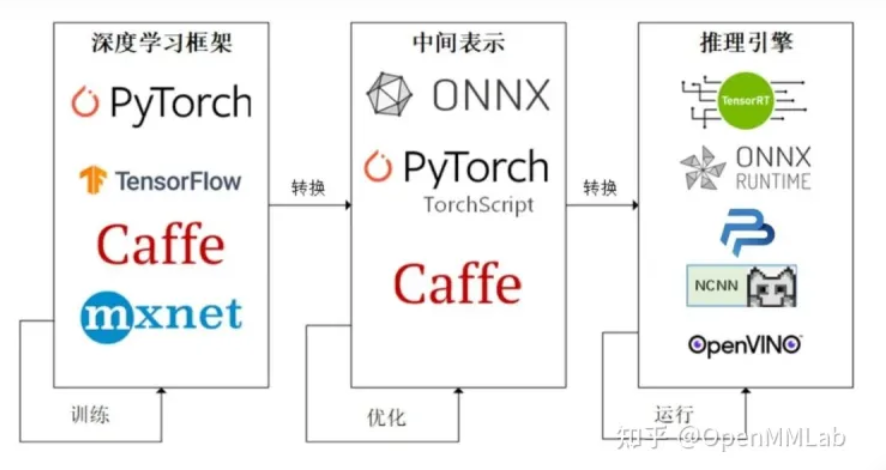
推理,指的是模型带着已经训练好的参数去应对完全未知的数据

之所以有个中间表示,其实我是这样理解的:如果没有中间表示,对于每种推理引擎来说,它们就要处理很多种来自不同框架的模型,比较麻烦

有了中间表示,它们只需要考虑一种中间表示怎么转成在该推理引擎上的模型就好了

部署第一个模型

准备

需要的环境:python,pytorch

需要安装的包:pip install onnxruntime onnx opencv-python

模型代码,超分辨率模型SRCNN

1
2
3
4
5
6
7
8
9
10
11
12
13
14
15
16
17
18
19
20
21
22
23
24
25
26
27
28
29
30
31
32
33
34
35
36
37
38
39
40
41
42
43
44
45
46
47
48
49
50
51
52
53
54
55
56
57
58
59
60
61
62
63
64
65
66
67
68
69
70
import os 

import cv2
import numpy as np
import requests
import torch
import torch.onnx
from torch import nn

class SuperResolutionNet(nn.Module):
def __init__(self, upscale_factor):
super().__init__()
self.upscale_factor = upscale_factor
self.img_upsampler = nn.Upsample(
scale_factor=self.upscale_factor,
mode='bicubic',
align_corners=False)

self.conv1 = nn.Conv2d(3,64,kernel_size=9,padding=4)
self.conv2 = nn.Conv2d(64,32,kernel_size=1,padding=0)
self.conv3 = nn.Conv2d(32,3,kernel_size=5,padding=2)

self.relu = nn.ReLU()

def forward(self, x):
x = self.img_upsampler(x)
out = self.relu(self.conv1(x))
out = self.relu(self.conv2(out))
out = self.conv3(out)
return out

# Download checkpoint and test image
urls = ['https://download.openmmlab.com/mmediting/restorers/srcnn/srcnn_x4k915_1x16_1000k_div2k_20200608-4186f232.pth',
'https://raw.githubusercontent.com/open-mmlab/mmediting/master/tests/data/face/000001.png']
names = ['srcnn.pth', 'face.png']
for url, name in zip(urls, names):
if not os.path.exists(name):
open(name, 'wb').write(requests.get(url).content)

def init_torch_model():
torch_model = SuperResolutionNet(upscale_factor=3)

state_dict = torch.load('srcnn.pth')['state_dict']

# Adapt the checkpoint
for old_key in list(state_dict.keys()):
new_key = '.'.join(old_key.split('.')[1:])
state_dict[new_key] = state_dict.pop(old_key)

torch_model.load_state_dict(state_dict)
torch_model.eval()
return torch_model

model = init_torch_model()
input_img = cv2.imread('face.png').astype(np.float32)

# HWC to NCHW
input_img = np.transpose(input_img, [2, 0, 1])
input_img = np.expand_dims(input_img, 0)

# Inference
torch_output = model(torch.from_numpy(input_img)).detach().numpy()

# NCHW to HWC
torch_output = np.squeeze(torch_output, 0)
torch_output = np.clip(torch_output, 0, 255)
torch_output = np.transpose(torch_output, [1, 2, 0]).astype(np.uint8)

# Show image
cv2.imwrite("face_torch.png", torch_output)

我们接下来会尝试将这个模型部署到onnx runtime

中间表示ONNX

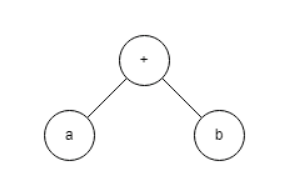
模型本身还是在进行数据的运算,这可以用计算图来表示,比如a + b的计算图:

有些框架会先保存模型的计算图再进行运算,这样的缺点是难以表示控制结构,比如if-else和for循环,不同的控制结构会产生不同的计算图,循环3次和100次天差地别

onnx是用于描述标准计算图的一种格式,我们使用

1
2
3
4
5
6
7
8
9
10
x = torch.randn(1, 3, 256, 256) 

with torch.no_grad():
torch.onnx.export(
model,
x,
"srcnn.onnx",
opset_version=11,
input_names=['input'],
output_names=['output'])

来把模型转为ONNX计算图

正如前面所说,之所以需要一组输入,是因为pytorch使用了一种名为追踪的转换方式,会根据这组示例输入来记录真实的控制流

因此,ONNX计算图是静态的

torch.onnx.export是PyTorch自带的把模型转换成ONNX格式的函数

前三个参数分别是要转换的模型、模型的任意一组输入、导出的ONNX文件的文件名

opset_version表示ONNX算子集的版本。深度学习的发展会不断诞生新算子,为了支持这些新增的算子,ONNX会经常发布新的算子集,目前已经更新15个版本

我们令 opset_version = 11,是因为 SRCNN 中的 bicubic (双三次插值)在 opset11 中才得到支持

剩下的两个参数 input_names, output_names 是输入、输出 tensor 的名称,我们稍后会用到这些名称

上面的代码会输出一个.onnx文件,想要验证其是否正确,我们使用下面的脚本

1
2
3
4
5
6
7
8
9
import onnx 

onnx_model = onnx.load("srcnn.onnx")
try:
onnx.checker.check_model(onnx_model)
except Exception:
print("Model incorrect")
else:
print("Model correct")

https://netron.app/可以对onnx格式的模型进行可视化,我们只需要将模型上传至网站即可
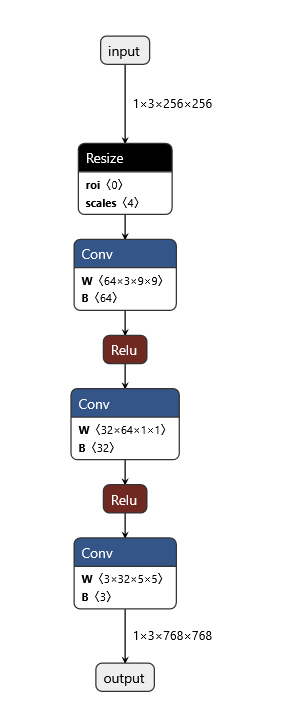
点击具体的某个模块,可以看到相应的信息

推理引擎

onnx runtime是推理引擎的一种,是直接对接onnx,可以读取onnx文件的

1
2
3
4
5
6
7
8
9
10
import onnxruntime 

ort_session = onnxruntime.InferenceSession("srcnn.onnx")
ort_inputs = {'input': input_img}
ort_output = ort_session.run(['output'], ort_inputs)[0]

ort_output = np.squeeze(ort_output, 0)
ort_output = np.clip(ort_output, 0, 255)
ort_output = np.transpose(ort_output, [1, 2, 0]).astype(np.uint8)
cv2.imwrite("face_ort.png", ort_output)

onnxruntime.InferenceSession用于获取一个 ONNX Runtime 推理器,其参数是用于推理的 ONNX 模型文件

其中输入值字典的 key 为张量名,value 为 numpy 类型的张量值。输入输出张量的名称需要和torch.onnx.export 中设置的输入输出名对应

推理器的 run 方法用于模型推理,其第一个参数为输出张量名的列表,第二个参数为输入值的字典

run方法也会返回一张列表

后面的几句意思是将输出存放在face_ort.png里

进阶

上面的例子已经展示了如何把一个模型部署至onnx runtime

实际上,因为这个例子比较简单,其内部涉及的卷积等操作在onnx中已经十分成熟

我们在部署更复杂的模型时,常常会遇到许多困难

1.出于性能的考虑,各推理框架都默认模型的输入形状、输出形状、结构是静态的。而为了让模型的泛用性更强,部署时需要在尽可能不影响原有逻辑的前提下,让模型的输入输出或是结构动态化

2.深度学习技术日新月异,提出新算子的速度往往快于 ONNX 维护者支持的速度。为了部署最新的模型,部署工程师往往需要自己在 ONNX 和推理引擎中支持新算子

3.由于各推理引擎的实现不同,对 ONNX 难以形成统一的支持。为了确保模型在不同的推理引擎中有同样的运行效果,部署工程师往往得为某个推理引擎定制模型代码,这为模型部署引入了许多工作量

结构动态化

如果在上述的模型中,我们想要用动态的放大倍率,即让upscale_factor这个参数变成运行时可更改的

这时候,我们需要更改模型的结构,把upscale_factor作为一个输入,使其可以在运行时传入

1
2
3
4
5
6
7
8
9
10
11
12
13
14
15
16
17
18
19
20
21
22
23
24
25
26
27
28
29
30
31
32
33
34
35
36
37
38
39
40
41
42
43
44
45
46
47
48
49
50
51
52
53
54
55
56
57
58
59
60
61
62
63
import torch 
from torch import nn
from torch.nn.functional import interpolate
import torch.onnx
import cv2
import numpy as np


class SuperResolutionNet(nn.Module):

def __init__(self):
super().__init__()

self.conv1 = nn.Conv2d(3, 64, kernel_size=9, padding=4)
self.conv2 = nn.Conv2d(64, 32, kernel_size=1, padding=0)
self.conv3 = nn.Conv2d(32, 3, kernel_size=5, padding=2)

self.relu = nn.ReLU()

def forward(self, x, upscale_factor):
x = interpolate(x,
scale_factor=upscale_factor,
mode='bicubic',
align_corners=False)
out = self.relu(self.conv1(x))
out = self.relu(self.conv2(out))
out = self.conv3(out)
return out


def init_torch_model():
torch_model = SuperResolutionNet()

state_dict = torch.load('srcnn.pth')['state_dict']

# Adapt the checkpoint
for old_key in list(state_dict.keys()):
new_key = '.'.join(old_key.split('.')[1:])
state_dict[new_key] = state_dict.pop(old_key)

torch_model.load_state_dict(state_dict)
torch_model.eval()
return torch_model


model = init_torch_model()

input_img = cv2.imread('face.png').astype(np.float32)

# HWC to NCHW
input_img = np.transpose(input_img, [2, 0, 1])
input_img = np.expand_dims(input_img, 0)

# Inference
torch_output = model(torch.from_numpy(input_img), 3).detach().numpy()

# NCHW to HWC
torch_output = np.squeeze(torch_output, 0)
torch_output = np.clip(torch_output, 0, 255)
torch_output = np.transpose(torch_output, [1, 2, 0]).astype(np.uint8)

# Show image
cv2.imwrite("face_torch_2.png", torch_output)

SuperResolutionNet 未修改之前,nn.Upsample 在初始化阶段固化了放大倍数,而 PyTorch 的 interpolate 插值算子可以在运行阶段选择放大倍数。因此,我们在新脚本中使用 interpolate 代替 nn.Upsample,从而让模型支持动态放大倍数的超分

此时再次尝试导出模型的话,就会遇到问题

1
2
3
4
5
6
7
8
x = torch.randn(1, 3, 256, 256) 

with torch.no_grad():
torch.onnx.export(model, (x, 3),
"srcnn2.onnx",
opset_version=11,
input_names=['input', 'factor'],
output_names=['output'])

自定义算子

刚刚的报错是因为 PyTorch 模型在导出到 ONNX 模型时,模型的输入参数的类型必须全部是 torch.Tensor。而实际上我们传入的第二个参数” 3 “是一个整形变量。这不符合 PyTorch 转 ONNX 的规定

这不简单嘛,我们改一下参数类型,然后传个torch.tensor(3)不就行了

果然行了,但问题是有warning,提示我们有一些量可能会追踪失败

我们用刚刚的方法看一下计算图,发现计算图还是和刚才一模一样?这是怎么回事呢,其实我们给出输入upscale_factor时,进行了upscale_factor.item()操作来拿到其中的内容

而这一步是无法被追踪的

我们需要自定义算子,观察计算图可以发现,无论是最开始的Upsample,还是后续的interpolate,都对应了计算图里的Resize层,里面的scale参数是我们希望能够自定义的

1
2
3
4
5
6
7
8
9
10
11
12
13
14
15
16
17
18
19
20
21
22
23
24
25
26
27
28
29
30
31
32
33
34
35
36
37
38
39
40
41
42
43
44
45
46
47
48
49
50
51
52
53
54
55
56
57
58
59
60
61
62
63
64
65
66
67
68
69
70
71
72
73
74
75
76
77
78
79
80
81
82
83
84
import torch 
from torch import nn
from torch.nn.functional import interpolate
import torch.onnx
import cv2
import numpy as np


class NewInterpolate(torch.autograd.Function):

@staticmethod
def symbolic(g, input, scales):
return g.op("Resize",
input,
g.op("Constant",
value_t=torch.tensor([], dtype=torch.float32)),
scales,
coordinate_transformation_mode_s="pytorch_half_pixel",
cubic_coeff_a_f=-0.75,
mode_s='cubic',
nearest_mode_s="floor")

@staticmethod
def forward(ctx, input, scales):
scales = scales.tolist()[-2:]
return interpolate(input,
scale_factor=scales,
mode='bicubic',
align_corners=False)


class StrangeSuperResolutionNet(nn.Module):

def __init__(self):
super().__init__()

self.conv1 = nn.Conv2d(3, 64, kernel_size=9, padding=4)
self.conv2 = nn.Conv2d(64, 32, kernel_size=1, padding=0)
self.conv3 = nn.Conv2d(32, 3, kernel_size=5, padding=2)

self.relu = nn.ReLU()

def forward(self, x, upscale_factor):
x = NewInterpolate.apply(x, upscale_factor)
out = self.relu(self.conv1(x))
out = self.relu(self.conv2(out))
out = self.conv3(out)
return out


def init_torch_model():
torch_model = StrangeSuperResolutionNet()

state_dict = torch.load('srcnn.pth')['state_dict']

# Adapt the checkpoint
for old_key in list(state_dict.keys()):
new_key = '.'.join(old_key.split('.')[1:])
state_dict[new_key] = state_dict.pop(old_key)

torch_model.load_state_dict(state_dict)
torch_model.eval()
return torch_model


model = init_torch_model()
factor = torch.tensor([1, 1, 3, 3], dtype=torch.float)

input_img = cv2.imread('face.png').astype(np.float32)

# HWC to NCHW
input_img = np.transpose(input_img, [2, 0, 1])
input_img = np.expand_dims(input_img, 0)

# Inference
torch_output = model(torch.from_numpy(input_img), factor).detach().numpy()

# NCHW to HWC
torch_output = np.squeeze(torch_output, 0)
torch_output = np.clip(torch_output, 0, 255)
torch_output = np.transpose(torch_output, [1, 2, 0]).astype(np.uint8)

# Show image
cv2.imwrite("face_torch_3.png", torch_output)

我们希望新的插值算子有两个输入,一个是被用于操作的图像,一个是图像的放缩比例。前面讲到,为了对接 ONNX 中 Resize 算子的 scales 参数,这个放缩比例是一个 [1, 1, x, x] 的张量,其中 x 为放大倍数。在之前放大3倍的模型中,这个参数被固定成了[1, 1, 3, 3]。因此,在插值算子中,我们希望模型的第二个输入是一个 [1, 1, w, h] 的张量,其中 w 和 h 分别是图片宽和高的放大倍数

算子的推理行为由算子的forward方法决定,其中第一个参数必定是ctx,后面的两个参数是我们设定的两个输入

新算子映射到 ONNX 的方法由一个算子的 symbolic 方法决定。symbolic 方法第一个参数必须是g,之后的参数是算子的自定义输入,和 forward 函数一样。ONNX 算子的具体定义由 g.op 实现。g.op 的每个参数都可以映射到 ONNX 中的算子属性

之后可以用同样的方法转到onnx并部署

1
2
3
4
5
6
7
8
9
10
11
12
13
14
15
16
17
18
19
20
21
x = torch.randn(1, 3, 256, 256) 

with torch.no_grad():
torch.onnx.export(model, (x, factor),
"srcnn3.onnx",
opset_version=11,
input_names=['input', 'factor'],
output_names=['output'])


import onnxruntime

input_factor = np.array([1, 1, 6, 6], dtype=np.float32)
ort_session = onnxruntime.InferenceSession("srcnn3.onnx")
ort_inputs = {'input': input_img, 'factor': input_factor}
ort_output = ort_session.run(None, ort_inputs)[0]

ort_output = np.squeeze(ort_output, 0)
ort_output = np.clip(ort_output, 0, 255)
ort_output = np.transpose(ort_output, [1, 2, 0]).astype(np.uint8)
cv2.imwrite("face_ort_3.png", ort_output)

问题是op怎么写?而且25行的数组切片操作还是报warning了

详解export